Table of Contents
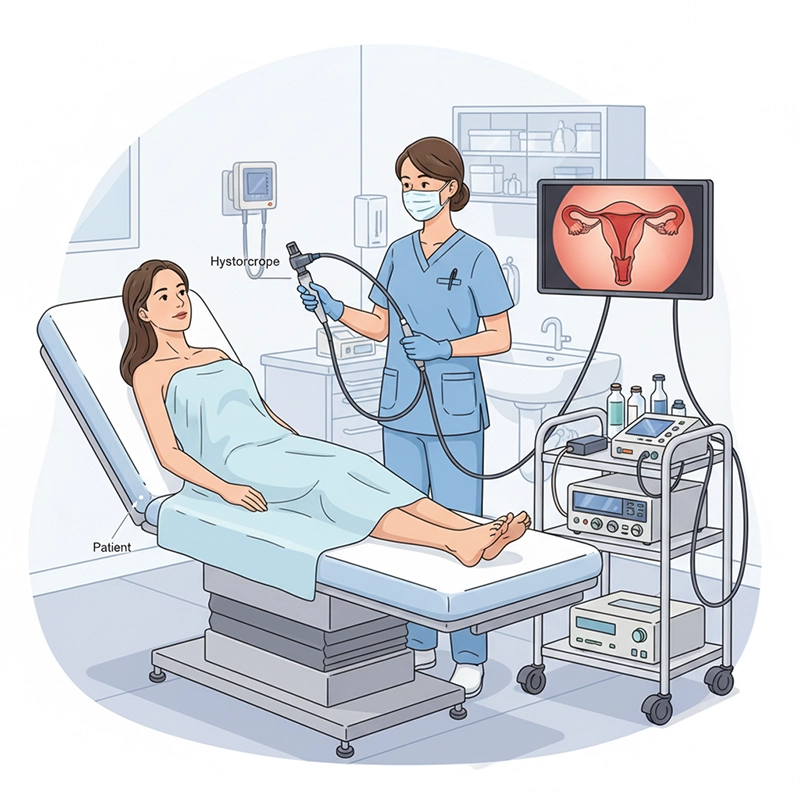
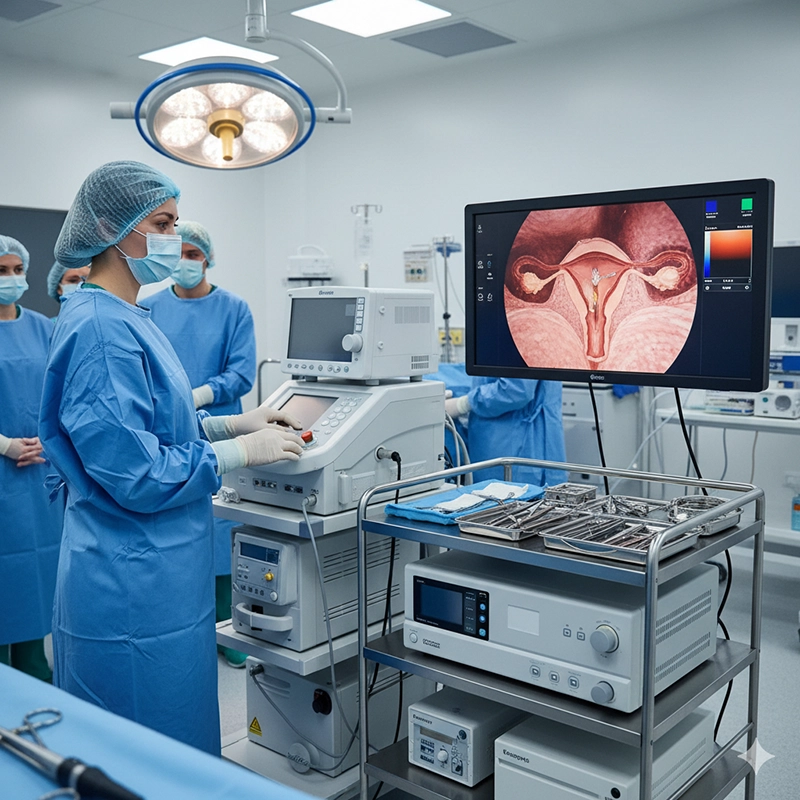
A hysteroscopy machine works as an end-to-end platform that combines a hysteroscope (rigid or flexible), a camera/processor, a light source, a medical display/recorder, and a fluid management pump to gently distend the uterus, deliver a stable view, and guide see-and-treat maneuvers under direct vision. The practical workflow is: (1) readiness check and white balance; (2) select distension media and set pressure limits—CO₂ commonly around 35–75 mmHg and liquid distension generally kept at or below ~100 mmHg; (3) continuous cavity survey and mapping; (4) treat pathology with a bipolar loop or mechanical shaver while tracking real-time inflow/outflow and fluid deficit (typical stop points are ~1,000 mL for hypotonic media and ~2,500 mL for isotonic saline in healthy adults, with lower thresholds for higher-risk patients); (5) capture stills/clips and export to EMR/PACS via DICOM with an audit trail; (6) immediately begin reprocessing to current standards to protect patients and preserve image quality.
Rigid scopes (e.g., 2.9–4.0 mm telescopes paired with diagnostic or operative sheaths) provide crisp images and support a wide 5 Fr instrument ecosystem, with 0° and 30° views covering most gyne cases. Flexible hysterovideoscopes (about 3.1–3.8 mm OD, wide FOV, two-way angulation) are friendly for office tolerance and curved anatomy; rigid optics still lead in edge sharpness and accessory breadth.
Access strategy: choose slim rigid or flexible optics for office tolerance; use larger operative sheaths when 5 Fr tools and higher flow are needed.
Orientation tip: 30° optics help look around folds and visualize both tubal ostia with less torque.
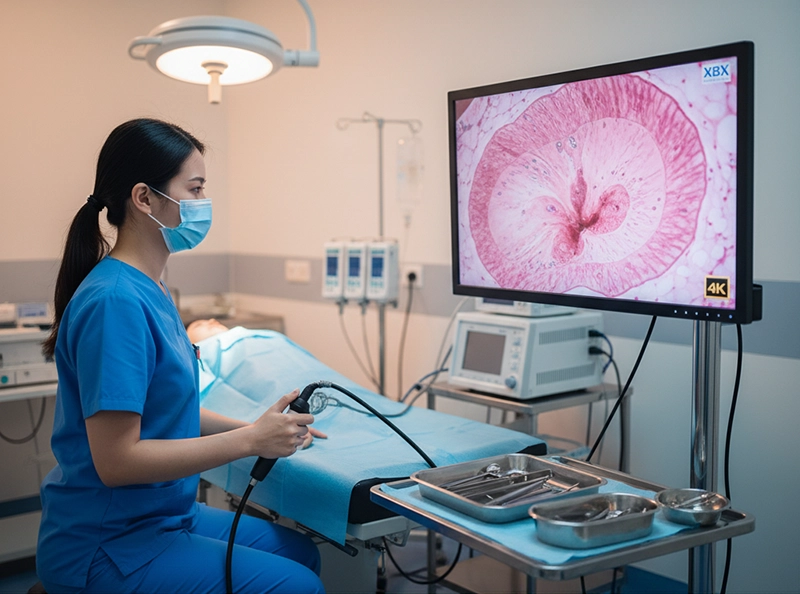
The camera head and CCU handle white balance, exposure, gain, enhancement, and latency. HD is serviceable; 4K boosts fine vascular detail, margin clarity, and the value of archived teaching clips. Evaluate latency, cabling, and ergonomics such as buttons, footswitches, and presets.
Re-white-balance after lens or light changes to maintain color accuracy.
Pair with a recorder that supports DICOM VL Endoscopic Image Storage for traceability.
LED is the default for quick start, cooler operation, and predictable life. Xenon can deliver peak intensity and pleasing spectral rendering but adds bulb life and heat considerations. Ambulatory rooms favor LED; deep ORs may use either based on team preference.
LED: uptime and thermal stability for most rooms.
Xenon: maximum brightness where preferred; plan for bulb maintenance.
Monitors in the 27–32 inch range are a sweet spot for carts and booms. Prioritize stable color, anti-reflective coatings, and clean routing from CCU to monitor and recorder. Use DICOM with Modality Worklist to minimize manual entry and mismatches.
Standardize monitor sizes and menu layouts across rooms for easier training.
Adopt consistent file naming and PACS-friendly metadata.
A closed-loop pump maintains target pressure, tracks inflow/outflow, and raises alarms as deficits climb. Look for readable screens, simple tubing paths, configurable stop points, and prompts that reduce setup errors.
Titrate pressure to visibility while avoiding intravasation risk.
Use pump flow increases briefly to clear the view rather than pushing pressure higher.
Bipolar loops allow saline and simplify electrolyte stewardship; mechanical shaver systems cut and aspirate simultaneously, often giving cleaner visualization for polyps and Type 0/1 fibroids. Keep both options available and choose per lesion type, size, and access.
Bipolar loop: broad indications; plan for chip retrieval.
Mechanical shaver: continuous suction and stable view; consider blade cost and availability.
Foot pedals, cable strain relief, and intuitive shelf layout reduce setup time and prevent accidental disconnections. A small pre-flight card on the cart (pressure limits, deficit stops, white-balance steps) cuts errors on busy lists.
Label shelves and cables; keep spare light and camera cables on the cart.
Place pedals where the surgeon naturally rests the foot; avoid cable loops.
Optics: rigid and flexible options matched to case mix.
Camera/processor: HD or 4K capture with low latency.
Light engine: LED or xenon per workflow.
Monitor/recorder: medical-grade display with DICOM export.
Fluid pump: closed-loop pressure and deficit monitoring.
Energy/shaver: bipolar loop and mechanical shaver availability.
Integration: DICOM/HL7 connectivity and simple SOPs.
Inspect objective windows, seals, and couplers; connect the camera; perform white balance.
Verify light output and cable integrity; reduce ambient glare.
Program the pump: target pressure, alarm thresholds, and deficit stops.
Prime tubing, clear bubbles, and label media bags.
Prepare normal saline for bipolar and shaver procedures; reserve non-electrolyte media for monopolar plans.
Confirm recorder date/time, patient context, and storage space.
Run a 30-second image walk (fundus to walls to ostia) to validate sharpness and color.
Enter under direct vision. Use gentle cervical alignment to avoid red-out. Map the cavity in a consistent sequence and annotate landmarks or suspected pathology as you proceed. Angled optics or flexible angulation help visualize both ostia.
Follow a repeatable survey path to avoid missed zones.
Capture stills of fundus, each ostium, and key lesions.
For polyps and Type 0/1 fibroids, a mechanical shaver often yields a cleaner view by aspirating chips while cutting. For septa or adhesions, bipolar loop resection in saline is a straightforward choice.
Increase flow briefly to clear bleeding; keep pressure as low as possible.
Label specimens clearly and maintain orientation with periodic reset views.
Capture a standard set of stills and short clips at decision points. Export via DICOM VL with Modality Worklist so PACS retains patient and procedure context. Use Performed Procedure Step to close the record and preserve an audit trail.
Adopt a room poster showing naming convention and export steps.
Verify one clip before the first case of the day to test the route.
Normal saline is the workhorse for bipolar and shaver cases. Hypotonic non-electrolyte media are reserved for monopolar energy and require tighter absorption monitoring due to hyponatremia risk. Standardize labels and color tags on media lines to prevent mix-ups.
Match media to energy modality and patient risk profile.
Conduct a verbal media check before therapy begins.
CO₂ pressures around 35–75 mmHg with modest flow usually suffice for diagnostic work. With fluids, keep the setpoint at or below ~100 mmHg and raise flow transiently to clear the field rather than increasing pressure.
Gravity at 1–1.5 m gives a rough pressure but lacks alarms and trending.
Pumps provide fine control, clear displays, and safety alerts.
Healthy adult stop points are roughly 1,000 mL for hypotonic media and 2,500 mL for isotonic saline. Lower thresholds are prudent for elderly or cardiac/renal compromise. If the deficit rises quickly, pause and rule out perforation.
Assign one nurse as deficit owner to announce totals periodically.
Document thresholds on the pre-flight card to keep the team aligned.
Hypotonic media: stop around a 1,000 mL deficit.
Isotonic saline: stop around a 2,500 mL deficit.
Higher-risk patients: adopt stricter, policy-based limits.
Increase flow within limits; avoid chasing visibility with pressure.
Consider vasoconstrictors per protocol and re-check tubing for kinks.
Switch to a mechanical shaver if smoke or fragments persist.
Bipolar loops confine current locally and run in saline. Maintain orientation with periodic reset views and plan chip retrieval in advance. Steady visualization and deliberate pace are key.
Use saline-compatible electrodes; verify power settings and footswitch mapping.
Keep suction ready for quick field clearing.
Shaver blades vary by window design and aggressiveness. Continuous suction stabilizes the field and can shorten cases for selected lesions. Train staff on blade assembly, footswitch logic, and safe standby positions.
Match blade type to lesion size and firmness.
Confirm spare blades and tubing sets before the list starts.
Media: both in isotonic saline.
Visibility: loop creates debris that requires retrieval; shaver’s suction keeps the field cleaner.
Lesion fit: loop covers a broad range including septa/adhesions; shaver excels for polyps and Type 0/1 fibroids.
Cost: loop has lower disposables; shaver adds blade cost but may shorten cases.
Learning: loop is traditional; shaver has a short learning curve with clear protocols.
Require DICOM VL Endoscopic Image Storage and Modality Worklist on the recorder or CCU. Map MRN, accession, body part, and procedure name consistently. Use Performed Procedure Step to close cases and preserve audit trails.
Standardize device names and room IDs to keep logs clean.
Test a mock export each morning before live cases.
Use role-based access for surgeons, circulating nurses, SPD, and biomed. Enforce time-stamped logins and auto-locks on carts. Patch firmware on a known cadence and keep a rollback plan. Define who can delete, export, and retain images.
Limit USB exports to authorized staff with sign-off.
Maintain a register of device firmware and patch history.
Anchor SOPs to current standards and manufacturer IFUs: point-of-use pre-cleaning, leak testing, manual cleaning with lumen flushing, validated HLD or sterilization, complete drying, tracked storage, and competency validation.
Keep printed IFU excerpts at the sink and storage areas.
Document each step with device serial numbers for traceability.
Moisture undermines uptime and infection control. Use channel drying and documented hang-time limits. Closed transport containers with clear clean/dirty states prevent cross-traffic confusion between decontam and clean areas.
Adopt color-coded tags for transport states.
Audit hang-time logs weekly with SPD leadership.
Adopt a 60-second daily QC: white-balance, a quick exposure test on a sterile card, light output check, and lens inspection. Log failures and pull devices before the next case if any step fails.
Use a laminated QC card on every cart.
Rotate spare scopes to avoid overuse of a single unit.
Score solutions across clinical fit, safety, efficiency, interoperability, total cost of ownership, and vendor support. Define measurable criteria for each bucket and collect evidence during demos, trials, and references.
Clinical fit: image clarity, scope sizes, instrument ecosystem.
Safety: pump alarms, deficit workflow, cable management.
Efficiency: setup time, quick-reference guides, cleaning access.
Interoperability: DICOM VL/MWL/PPS, HL7 or FHIR bridges.
TCO: capex, disposables, service intervals, lamp/LED life.
Vendor support: training materials, response times, loaner policy.
Clinical fit — 25%: image sharpness, scope range, instrument compatibility.
Safety — 20%: alarms, deficit tracking reliability, tubing clarity.
Efficiency — 15%: mean setup time, quick-ref guides, cleaning access.
Interoperability — 15%: DICOM and HL7 conformance with test logs.
TCO — 15%: capital, disposables, service plans, downtime assumptions.
Vendor support — 10%: in-service training, on-site response, loaners.
Total cost equals capital (scopes, CCU, light, pump, monitor, cart) plus disposables (blades, tubing), reprocessing (chemistry, cabinets), service (contracts, spares), and downtime (lost cases). Model three to five years with scenario ranges and stated assumptions.
Track lamp versus LED life; plan replacements and spares.
Include salvage or resale value in the last year of the model.
Start with one office room and one OR. Define acceptance criteria: image clarity checklists, deficit tracking reliability, DICOM export completeness, and user satisfaction. After a six to eight week pilot, lock the configuration and train additional rooms.
Hold a lessons-learned session before scaling.
Freeze cable routing and cart layouts to reduce variability.
Configure a slim rigid or flexible optic with a portable host, compact pump, and a 27 inch medical monitor. Track start-to-scope time, patient tolerance, and rebook rate. Teams often see faster room turns and more same-day therapy for small polyps.
Keep a printed see-and-treat SOP on the cart.
Pre-stage blades and tubing to avoid mid-case delays.
Use rigid optics, a 4K CCU and monitor, LED light, a full-size pump, and both bipolar and shaver tools. Measure visualization scores under bleeding, instrument exchanges per case, DICOM export completeness, and mean anesthesia time.
Standardize 4K profiles across rooms to keep color matching consistent.
Log pump calibrations and alarm test results monthly.
Use the XBX portable host when rooms are small or shared across clinics. Pair with slim rigid optics (2.9–3.5 mm) or a flexible scope for walk-in diagnostics. Add a compact pump with clear deficit trending and a 27 inch medical monitor. Keep a printed quick reference for white balance and pump presets on the cart.
Ideal for see-and-treat programs and mobile outreach.
Supports rapid setup with minimal cabling complexity.
For hospital rooms where carts rotate between suites, the XBX desktop host provides a stable HD output path with tactile front-panel controls. Combine with bipolar resection and a mechanical shaver to cover benign pathology, plus a recorder that exports DICOM VL with Modality Worklist.
Standardize carts so staff can move between rooms seamlessly.
Document interface guides with IT for faster onboarding.
Where gynecology, urology, and ENT share stacks, standardize on one imaging user interface so training transfers cleanly. Build two cart types: an ambulatory cart (portable host, compact pump) and an OR cart (4K imaging, full pump, shaver). Keep layout, labels, and cable paths identical across rooms.
Reduce error rates by using the same pedal and connector positions.
Reuse SOPs and checklists to shorten training time.
Optics: one flexible diagnostic option and a slim rigid set with 5 Fr-compatible operative sheaths.
Imaging: HD minimum; optional 4K with documented latency and color stability.
Light: LED default; specify brightness, color rendering, and noise level.
Pump: closed-loop control, configurable alarms, deficit trending, and clear tubing paths.
Tissue removal: bipolar loop and mechanical shaver availability with blade catalog and lead times.
Integration: DICOM VL/MWL/PPS; HL7 mapping; named, testable interface points.
Processing: IFU-aligned SOPs; drying and storage equipment; competency documentation.
Training and support: in-service training, response times, and loaner policy.
Power, network, and PACS access validated; Modality Worklist tested.
Cart routes planned to avoid thresholds and cable snags.
SPD traffic map shows dirty-to-clean flow; transport containers labeled.
Emergency backup gravity set and printed adverse event steps available.
Laminated pre-case and end-of-case cards on each cart.
Verify white balance and a test exposure in each room.
Confirm pump alarm thresholds and deficit stop points per case list.
Run a mock DICOM export; check for correct patient context.
Capture a baseline teaching clip using the agreed naming scheme.
End-of-day: export logs, wipe consoles, and start reprocessing promptly.
A well-configured hysteroscopy machine is not a single box but a coordinated platform. When optics, imaging, pump, recording, integration, and reprocessing are standardized and measured with simple, repeatable checklists, setup is faster, visibility is steadier, and documentation is cleaner with fewer errors. For hospitals scaling step by step, begin with an office-friendly XBX portable host cart, then add an OR cart with 4K imaging and a full-size pump. With one familiar interface and consistent SOPs across rooms, training becomes simpler, throughput improves, and clinical risk is easier to manage without overbuying features you will not use.
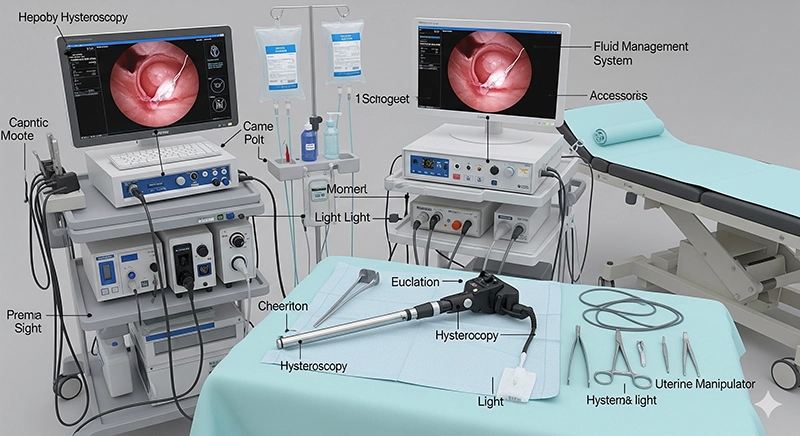
A hysteroscopy machine is a coordinated platform, not a single box. Core modules include: a rigid or flexible hysteroscope, camera + control unit (HD/4K), light source (LED or xenon), medical display/recorder (with DICOM export), a fluid management pump (pressure/flow/deficit control), and operative tools (bipolar loop and/or mechanical shaver). A standardized cart and accessories (cables, pedals, couplers) complete the setup.
Diagnostic CO₂ is commonly controlled around 35–75 mmHg. For liquid distension, teams typically keep setpoints ≤ ~100 mmHg and rely on the lowest pressure that preserves visibility. Common stop points (healthy adults) are ~1,000 mL deficit for hypotonic media and ~2,500 mL for isotonic saline; lower thresholds are prudent for high-risk patients.
Use slim rigid or flexible scopes for office tolerance and easier cervical passage; use rigid optics with operative sheaths when you need 5 Fr instruments and higher flow. Rigid optics usually provide crisper edges; flexible scopes offer angulation and comfort for diagnostic work.
HD is serviceable, but 4K improves edge clarity (vascular patterns, lesion margins) and increases the training value of recorded clips. If you train residents, present cases, or share rooms with other specialties, 4K tends to pay off in visualization quality.
Yes, with a slim rigid or flexible scope, portable host, compact fluid pump, and a clear SOP for pressure/deficit monitoring. Key prerequisites: trained staff, emergency plan, reprocessing capabilities aligned to standards, and a consistent checklist for white balance, pump presets, and documentation.

We not only provide sales of endoscope products, but also provide OEM/ODM customization services. We sincerely invite global partners to become industry innovators and share the hundreds of billions of market dividends. You are not only an agent, but also a strategic partner - your channel resources + our full-link empowerment = unlimited growth possibilities
Copyright © 2025.Geekvalue All rights reserved.Technical Support:TiaoQingCMS